How To Install A Ceiling Fan Without An Electrician
How how to install a ceiling fan without an electrician quietly became one of the most fascinating subjects you've never properly explored.
At a Glance
- Subject: How To Install A Ceiling Fan Without An Electrician
- Subject: How To Install A Ceiling Fan Without An Electrician
- Category: Home Improvement / DIY
- Difficulty: Moderate
- Estimated Time: 2-4 hours
- Tools Needed: Screwdrivers, voltage tester, drill, ladder, wire strippers
- Safety Note: Always turn off power at the circuit breaker before beginning work.
At a Glance

The Hidden Power of the DIY Approach
Ever wonder why ceiling fan installation feels like a secret society guarded by electricians? The truth is, with a little courage and preparation, you can bypass the high-cost service fees and bring cool air into your space yourself. But here’s the catch — it’s not just about screwing in a blade. It's about understanding the complex dance of electrical wiring, safety protocols, and mechanical assembly that transforms a simple fan kit into a functional masterpiece.


The Secret to Safety: The Power of the Circuit Breaker
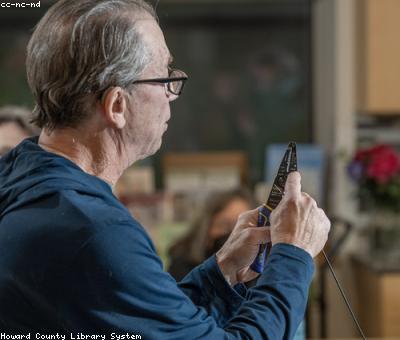
First things first — turn off the power. Yes, that little switch at the breaker box is your best friend. More than one DIY enthusiast has learned this the hard way. The circuit breaker is your safeguard against electric shocks. Use a voltage tester to confirm that the wires are dead before you even think about touching them. Trust no one who skips this step.
Wait, really? Skipping the breaker switch and voltage test can lead to dangerous shocks or even fires. Never underestimate electrical safety.


The Blueprint: Understanding Your Ceiling and Electrical Box
Not all ceilings are created equal. Some are sturdy and reinforced, others are shaky or oddly shaped. Check your ceiling’s structure — if you’re unsure, a quick inspection with a flashlight and a sturdy ladder is enough. The electrical box must be rated for ceiling fans, typically labeled as "fan-rated" or "sup" mounted. If you find a standard box, replace it with a fan-rated box from your local hardware store. This isn’t the moment to cut corners.
In some homes, the existing wiring may have been designed for lighting only. You might need to run new wiring from the circuit panel to the fan location, which is more advanced and could require professional help or detailed guidance from DIY wiring tutorials.

The Mechanical Dance: Assembling and Mounting the Fan
Once your electrical groundwork is set, it’s time to focus on the fan itself. Most kits come with detailed instructions, but here’s the secret: the mounting bracket is your anchor. Attach it securely to the electrical box, making sure it can support the weight of the fan. Use a drill with the appropriate bit to fix the bracket with heavy-duty screws.
Next, assemble the fan blades and motor assembly on the ground. It’s easier to do this before hanging it, and it prevents accidents. When hanging the fan, lift carefully and align the mounting bracket with the fan’s canopy. Secure with the provided hardware. It’s a two-person job — don’t be shy about asking for help.
“The key is patience. Rushing leads to wobbling fans and loose connections. Take your time.” — Veteran DIY Homeowner

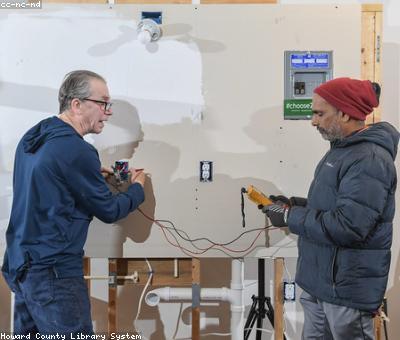
Wiring 101: Connecting Wires Without Getting Shocked
Here’s where many get tripped up: wiring. The typical fan has four wires: black (hot), white (neutral), green (ground), and sometimes a blue or red for fan speeds or lights. Match these to your ceiling wires — usually black to black, white to white, and green to ground.
Strip the wire ends carefully, twist like a pro, and secure with wire connectors. Use pliers if needed. For safety, tape the wire nuts and double-check all connections with your voltage tester before restoring power.
Wait, really? Incorrect wiring can cause short circuits or fires. If unsure, consult a wiring diagram or call a local expert for a quick review.
Turning It On and Balancing the Breeze
With everything connected, it’s time for the moment of truth. Turn the circuit breaker back on, and switch on your new fan. If it whirs to life smoothly, congratulations! If it wobbles, you may need to tighten the mounting or balance the blades with adjustable weights.
Most fans include a balancing kit — use it! A perfectly balanced fan not only looks better but runs quieter and lasts longer.
And here’s a fun fact: some DIYers have installed smart controls or remote modules themselves, unlocking features that even seasoned electricians might overlook. Innovation is the spirit of DIY.

Beyond the Basics: Customizing and Troubleshooting
If your fan has a light kit, wiring it into your home's existing lighting circuit can be a rewarding challenge. Use a step-by-step guide for a seamless integration. Troubleshooting common issues like humming, wobbling, or flickering can be tackled with simple adjustments, but always prioritize safety.
For those feeling adventurous, installing a remote control system transforms your fan into a smart device, controllable from anywhere. It’s a little more complex but entirely doable for the dedicated DIY enthusiast.


The Surprise Twist: When DIY Becomes a Hobby
Many who start installing ceiling fans on their own discover a passion for home improvement they never expected. It’s not just about saving money — it's about empowerment. From re-wiring outlets to installing skylights, the skills you develop ripple into other areas of your home. The joy of turning a complicated task into a victory is addictive.
So, next time you see a ceiling fan hanging quietly, remember — somebody just like you wired it, balanced it, and made it run. With the right mindset and a handful of tools, you're already halfway there.
Comments